2011年10月1日土曜日

Chapter04: 縦方向に均等配置

前回は、横方向に均等配置でした。今回は、縦方向に均等配置です。
内容はどう違うの?という話ですが、ほぼ同じです。
なので、今回はサラッと流します。

注目すべき点は、同じくlayout_weightです。

では、サンプルを見てみましょう。
サンプルアプリで、メニューを押して、chapter04を選択してください。
以下のような画面になります。
この画面は、LinearLayoutで横方向配置を指定した後に、さらにLinearLayoutを3つ入れて、それぞれは縦方向配置の設定をしています。
layout_weightは、レイアウトの重みづけで、高ければ高いほど重要度が増すとChapter03で説明しました。このレイアウトも、Chapter03の縦版なので、同様の設定になっています。


コードレビュー

では、レイアウトのソースコードを見てみましょう。Sample01プロジェクトの/res/layout/chapter04.xmlを開いてください。
<?xml version="1.0" encoding="utf-8"?>
<LinearLayout
    xmlns:android="http://schemas.android.com/apk/res/android"
    android:orientation="horizontal"
    android:layout_width="fill_parent"
    android:layout_height="fill_parent">
    <!-- 
        縦方向均等配置をするため、親要素のLinearLayoutのorientationをverticalに設定します。
        ここでは、layout_weightが肝です。指定された方向に対してウェイトが重い分だけ、拡がります。 
        デフォルトは0なので、1つの要素でも1を与えるとそれが残りの領域を占拠します。
        また、均等配置する方向が横の場合、layout_widthに有効な値をいれても無駄になるので0dpを入れます。
     -->
    <!-- 均等配置
         全ての要素にlayout_weight="1"を設定 -->
    <LinearLayout
        android:orientation="vertical"
        android:layout_width="wrap_content"
        android:layout_height="fill_parent">
        <Button
            android:id="@+id/button1"
            android:layout_width="wrap_content"
            android:layout_height="0dp"
            android:layout_weight="1"
            android:text="@string/chapter04_button1" />
        <Button
            android:id="@+id/button2"
            android:layout_width="wrap_content"
            android:layout_height="0dp"
            android:layout_weight="1"
            android:text="@string/chapter04_button2" />
        <Button
            android:id="@+id/button3"
            android:layout_width="wrap_content"
            android:layout_height="0dp"
            android:layout_weight="1"
            android:text="@string/chapter04_button3" />
    </LinearLayout>
    <!-- 1つの要素だけlayout_weightを設定
         ただし、layout_weightが設定されてないボタンが表示されるように、
         layout_height="wrap_content"にしてます。 -->
    <LinearLayout
        android:orientation="vertical"
        android:layout_width="wrap_content"
        android:layout_height="fill_parent">
        <Button
            android:id="@+id/button4"
            android:layout_width="wrap_content"
            android:layout_height="wrap_content"
            android:text="@string/chapter04_button4" />
        <Button
            android:id="@+id/button5"
            android:layout_width="wrap_content"
            android:layout_height="wrap_content"
            android:text="@string/chapter04_button5" />
        <Button
            android:id="@+id/button6"
            android:layout_width="wrap_content"
            android:layout_height="0dp"
            android:layout_weight="1"
            android:text="@string/chapter04_button6" />
    </LinearLayout>
    <!-- 全ての要素にlayout_weightを設定
         但し、button9のみweightを2にしている -->
    <LinearLayout
        android:orientation="vertical"
        android:layout_width="wrap_content"
        android:layout_height="fill_parent">
        <Button
            android:id="@+id/button7"
            android:layout_width="wrap_content"
            android:layout_height="0dp"
            android:layout_weight="1"
            android:text="@string/chapter04_button7" />
        <Button
            android:id="@+id/button8"
            android:layout_width="wrap_content"
            android:layout_height="0dp"
            android:layout_weight="1"
            android:text="@string/chapter04_button8" />
        <Button
            android:id="@+id/button9"
            android:layout_width="wrap_content"
            android:layout_height="0dp"
            android:layout_weight="2"
            android:text="@string/chapter04_button9" />
    </LinearLayout>
</LinearLayout>
※以降、Chapter03と同じ言い回しになりますので、無視したい人は無視してください。
注目するべきは、layout_heightの値を0dpにしているところですlayout_heightに0dp以外の有効な値を入れると、無駄に解析が入ってしまって非効率だからです。モバイル端末は基本的に非力だしバッテリー持たせる必要があるので、無駄な処理は極力削ります。それはプログラムだけでなく、レイアウトのXMLでも言えるのです。

layout_heightの効能は、LinearLayoutのorientationの方向で意味づけが決まるので、verticalの場合は、縦方向に効きます。なので、layout_height="0dp"なわけです。

均等配置がlayout_weightを指定するだけで簡単にできることがわかってもらえたかと思います。

Chapter03: 横方向に均等配置

LinearLayoutとRelativeLayoutの説明が終わりましたので、ここからはLinearLayoutを使った具体的なレイアウトの方法に入っていきます。とはいってもまだ基本編です。

アプリを使っている人はよく見かけていると思うのですが、ボタンなどの均等配置はどうやるのだろうか?と。CSSならば、もともと決まっているwidthの値を3で割って…などだと思うのですが、Androidでは、もっと簡単な方法が準備されています。

それはlayout_weightという属性です。

では、サンプルを見てみましょう。
サンプルアプリで、メニューを押して、chapter03を選択してください。
以下のような画面になります。
この画面は、LinearLayoutで縦方向配置の指定をした後に、さらにLinearLayoutを3つ入れて、それぞれは横方向配置の設定をしています。

先ほど言った、layout_weightという属性は、レイアウトの重みづけに当たります。高ければ高いほど、重要度が増します。下の画像の赤枠で囲まれている部分のように均等に配置したい場合は、layout_weight全て1にします。

他の場合も見てもらおうと思い、設定してありますが、2行目のボタンの部分は、ボタン4、ボタン5にはlayout_weightを指定していません。そして、ボタン6のみ、1を指定しています。すると、ボタン6が一番重要ということになり、残された領域全部を使います。

3行目のボタンは、全てにlayout_weightを指定していますが、ボタン9のみ、layout_weightに2を指定しています。重要度に比例して領域を確保するので、1:1:2の比率で配置されているのがわかります。


コードレビュー

では、レイアウトのソースコードを見てみましょう。 Sample01プロジェクトの/res/layout/chapter03.xmlを開いてください。
<?xml version="1.0" encoding="utf-8"?>
<LinearLayout
    xmlns:android="http://schemas.android.com/apk/res/android"
    android:orientation="vertical"
    android:layout_width="fill_parent"
    android:layout_height="fill_parent">
    <!-- 
        横方向均等配置をするため、親要素のLinearLayoutのorientationをhorizontalに設定します。
        ここでは、layout_weightが肝です。指定された方向に対してウェイトが重い分だけ、拡がります。 
        デフォルトは0なので、1つの要素でも1を与えるとそれが残りの領域を占拠します。
        また、均等配置する方向が横の場合、layout_widthに有効な値をいれても無駄になるので0dpを入れます。
     -->
    <!-- 均等配置
         全ての要素にlayout_weight="1"を設定 -->
    <LinearLayout
        android:orientation="horizontal"
        android:layout_width="fill_parent"
        android:layout_height="wrap_content">
        <Button
            android:id="@+id/button1"
            android:layout_width="0dp"
            android:layout_height="wrap_content"
            android:layout_weight="1"
            android:text="@string/chapter03_button1" />
        <Button
            android:id="@+id/button2"
            android:layout_width="0dp"
            android:layout_height="wrap_content"
            android:layout_weight="1"
            android:text="@string/chapter03_button2" />
        <Button
            android:id="@+id/button3"
            android:layout_width="0dp"
            android:layout_height="wrap_content"
            android:layout_weight="1"
            android:text="@string/chapter03_button3" />
    </LinearLayout>
    <!-- 1つの要素だけlayout_weightを設定
         ただし、layout_weightが設定されてないボタンが表示されるように、
         layout_width="wrap_content"にしてます。 -->
    <LinearLayout
        android:orientation="horizontal"
        android:layout_width="fill_parent"
        android:layout_height="wrap_content">
        <Button
            android:id="@+id/button4"
            android:layout_width="wrap_content"
            android:layout_height="wrap_content"
            android:text="@string/chapter03_button4" />
        <Button
            android:id="@+id/button5"
            android:layout_width="wrap_content"
            android:layout_height="wrap_content"
            android:text="@string/chapter03_button5" />
        <Button
            android:id="@+id/button6"
            android:layout_width="0dp"
            android:layout_height="wrap_content"
            android:layout_weight="1"
            android:text="@string/chapter03_button6" />
    </LinearLayout>
    <!-- 全ての要素にlayout_weightを設定
         但し、button9のみweightを2にしている -->
    <LinearLayout
        android:orientation="horizontal"
        android:layout_width="fill_parent"
        android:layout_height="wrap_content">
        <Button
            android:id="@+id/button7"
            android:layout_width="0dp"
            android:layout_height="wrap_content"
            android:layout_weight="1"
            android:text="@string/chapter03_button7" />
        <Button
            android:id="@+id/button8"
            android:layout_width="0dp"
            android:layout_height="wrap_content"
            android:layout_weight="1"
            android:text="@string/chapter03_button8" />
        <Button
            android:id="@+id/button9"
            android:layout_width="0dp"
            android:layout_height="wrap_content"
            android:layout_weight="2"
            android:text="@string/chapter03_button9" />
    </LinearLayout>
</LinearLayout>
注目するべきは、layout_widthの値を0dpにしているところです。dpという単位は初めて聞いたと思いますが、これはAndroidで各端末の解像度の違いを吸収するための単位です。基本的にdpを使ってレイアウトをするのですが、単位は他の記事で扱おうと思っているので、ここではこの辺で割愛します。

じゃあなんで注目やねんという話ですが、layout_widthに0dp以外の有効な値を入れると、無駄に解析が入ってしまって非効率だからです。モバイル端末は基本的に非力だしバッテリー持たせる必要があるので、無駄な処理は極力削ります。それはプログラムだけでなく、レイアウトのXMLでも言えるのです。

layout_weightの効能は、LinearLayoutのorientationの方向で意味づけが決まるので、horizontalの場合は、横方向に効きます。なので、layout_width="0dp"なわけです。

均等配置がlayout_weightを指定するだけで簡単にできることがわかってもらえたかと思います。

2011年9月30日金曜日

Chapter02: RelativeLayoutの特徴

次はRelativeLayoutの説明をします。
RelativeLayoutとは、相対レイアウト用のレイアウトです。子要素を親要素であるRelativeLayoutから相対的に配置することができます。また、子要素同士も、id指定で配置することができます。

では、サンプルを見てみましょう。
サンプルアプリで、メニューを押して、chapter02を選択してください。以下のような画面になります。
 
この画面は、RelativeLayoutの下に、各ポジションを表すTextViewを配置しています。LinearLayoutと違って、自由度が大きいことがわかるかと思います。
赤枠で囲まれているのが、親要素のRelativeLayoutに対して相対的な配置です。
青枠で囲まれているのが、子要素の「中央」というTextViewに対して相対的な配置です。

コードレビュー

では、レイアウトのソースコードを見てみましょう。
Sample01プロジェクトの/res/layout/chapter02.xmlを開いてください。

注目するべきところは、子要素であるTextViewの以下の属性です。
  • 親要素に対する配置(指定値 = true, false)
    • layout_alignParentTop・・・親要素の上部に要素を配置する
    • layout_alignParentBogttom・・・親要素の下部に要素を配置する
    • layout_alignParentLeft・・・親要素の左部に要素を配置する
    • layout_alignParentRight・・・親要素の右部に要素を配置する
    • layout_centerInParent・・・親要素の縦横の中央に要素を配置する
    • layout_centerVertical・・・親要素の縦方向の中央に要素を配置する
    • layout_centerHorizontal・・・親要素の横方向の中央に要素を配置する
  • 子要素同士に対する配置(指定値 = 要素のid)
    • layout_above・・・指定された要素の上に配置する
    • layout_below・・・指定された要素の下に配置する
    • layout_toLeftOf・・・指定された要素の左に配置する
    • layout_toRightOf・・・指定された要素の右に配置する
子要素同士で指定しているidは、中央に配置した要素@id/CenterInParentに対してです。 属性名にalignとかcenterとか出てくるので、Webデザイナーの人でも直観的にわかりやすいかなと思います。
<?xml version="1.0" encoding="utf-8"?>
<RelativeLayout
    xmlns:android="http://schemas.android.com/apk/res/android"
    android:layout_width="fill_parent"
    android:layout_height="fill_parent">
    <!-- 
        RelativeLayoutは相対レイアウトです。
        RelativeLayoutの下のウィジェット類は、親のRelativeLayoutに対して相対的に配置されます。
        ■がそれです。
        ■   ■
        
          ■
          
        ■   ■
      -->
    <!-- 親要素に対して左上に配置 -->
    <TextView
        android:id="@+id/LeftTop"
        android:layout_alignParentLeft="true"
        android:layout_alignParentTop="true"
        android:layout_width="wrap_content"
        android:layout_height="wrap_content"
        android:text="@string/chapter02_left_top" />
    <!-- 親要素に対して左下に配置 -->
    <TextView
        android:id="@+id/LeftBottom"
        android:layout_alignParentLeft="true"
        android:layout_alignParentBottom="true"
        android:layout_width="wrap_content"
        android:layout_height="wrap_content"
        android:text="@string/chapter02_left_bottom" />
    <!-- 親要素に対して右上に配置 -->
    <TextView
        android:id="@+id/RightTop"
        android:layout_alignParentRight="true"
        android:layout_alignParentTop="true"
        android:layout_width="wrap_content"
        android:layout_height="wrap_content"
        android:text="@string/chapter02_right_top" />
    <!-- 親要素に対して右下に配置 -->
    <TextView
        android:id="@+id/RightBottom"
        android:layout_alignParentRight="true"
        android:layout_alignParentBottom="true"
        android:layout_width="wrap_content"
        android:layout_height="wrap_content"
        android:text="@string/chapter02_right_bottom" />
    <!-- 親要素に対して中央に配置 -->
    <TextView
        android:id="@+id/CenterInParent"
        android:layout_centerInParent="true"
        android:layout_width="wrap_content"
        android:layout_height="wrap_content"
        android:text="@string/chapter02_center_in_parent" />
    <!-- ここから、中央の要素に対して相対配置します。□がそれです。
         ■   ■
           □
          □■□
           □
         ■   ■
     -->
    <!-- 上
        layout_aboveで指定されたIDの要素の上に配置されます。
        横方向で中央揃えするために、layout_centerHorizontalをtrueにしてます。
     -->
    <TextView
        android:id="@+id/above"
        android:layout_above="@id/CenterInParent"
        android:layout_centerHorizontal="true"
        android:layout_width="wrap_content"
        android:layout_height="wrap_content"
        android:text="@string/chapter02_above" />
    <!-- 下
        layout_belowで指定されたIDの要素の下に配置されます。
        横方向で中央揃えするために、layout_centerHorizontalをtrueにしてます。
     -->
    <TextView
        android:id="@+id/below"
        android:layout_below="@id/CenterInParent"
        android:layout_centerHorizontal="true"
        android:layout_width="wrap_content"
        android:layout_height="wrap_content"
        android:text="@string/chapter02_below" />
    <!-- 左
        layout_toLeftOfで指定されたIDの要素の左に配置されます。
        縦方向で中央揃えするために、layout_centerVerticalをtrueにしてます。
    -->
    <TextView
        android:id="@+id/toLeftOf"
        android:layout_toLeftOf="@id/CenterInParent"
        android:layout_centerVertical="true"
        android:layout_width="wrap_content"
        android:layout_height="wrap_content"
        android:text="@string/chapter02_to_left_of" />
    <!-- 右
        layout_toRightOfで指定されたIDの要素の右に配置されます。
        縦方向で中央揃えするために、layout_centerVerticalをtrueにしてます。
    -->
    <TextView
        android:id="@+id/toRightOf"
        android:layout_toRightOf="@id/CenterInParent"
        android:layout_centerVertical="true"
        android:layout_width="wrap_content"
        android:layout_height="wrap_content"
        android:text="@string/chapter02_to_right_of" />
</RelativeLayout>
RelativeLayoutが便利なところは、中央に要素を置くのが簡単なところです。画像を中央に配置するなど、layout_centerInParentを指定するだけでよいので、画像を使った表示の場合などによく使ってます。
LinearLayoutに比べると、思った通りに要素の配置が行いやすいはずです。そのかわり、XMLでの要素指定が複雑化する場合があるので、把握するのが大変になったりします。

全てをRelativeLayoutで配置するのではなく、LinearLayoutとRelativeLayoutを上手に使って配置するのがよいでしょう。

2011年9月29日木曜日

Android端末で開発中のアプリを試すための設定

レイアウトの記事を書いている途中でまた気づいたので、また別の話題になりますが、Android端末で開発中のアプリを試すための設定方法です。

まず、ホーム画面でメニューボタンを押し、設定を押します。

 次に、設定のリスト内から、アプリケーションを選択します。
 提供元不明のアプリのインストールを許可するにチェックを入れます。これは、普段はチェックを外しておいたほうが安全です。野良アプリ(Android Marketに登録されていないアプリ)とかインストールする場合はチェックが必要です。

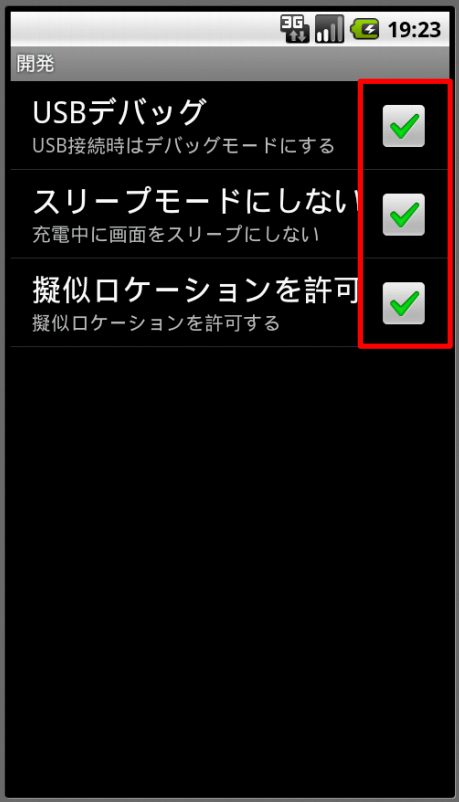
続いて、開発を選択します。
すべてにチェックを入れます。疑似ロケーションを許可は、GPSアプリとかを作る場合のみほしい機能なので、特に入れなくてもいいですが、とりあえず。疑似ロケーションとは、東京にいながらにして京都にいるかのごとくGPSデータをいじったりすることです。
これで、Eclipseから実機に開発中のアプリをインストールする準備ができました。

なお、開発中以外は全部外しておくことをお勧めします。変なアプリをインストールされても私は知りません!

Chapter01:LinearLayoutの特徴

では、ようやくレイアウトXMLの説明に入ります。
今回は、サンプルアプリのChapter01でLinearLayoutの説明をします。

まだプロジェクトをインポートしていない場合は、こちらの記事を先に読んでください。

先に説明しておきますが、Androidのレイアウト要素には、以下の種類があります。

  • LinearLayout(リニアレイアウト)
  • RelativeLayout(リレーティブレイアウト)
  • FrameLayout(フレームレイアウト)
  • TableLayout(テーブルレイアウト)
  • AbsoluteLayout(現在は非推奨)

5種類ありますが、ほとんどの場合、上の3種類のみを使います。特に、LinearLayoutとRelativeLayoutを多用するので、この講座(基本編)では、この2つに絞って説明します。

そもそもLayoutって何?

Layoutは、HTML的に平たくいうと、divタグみたいなものです。入れ物です。TableLayoutはtableタグみたいなものですが。しかし、名前が違うのでそれぞれ特徴があります。しかしここでは言及しません。

LinearLayoutって何?

LinearLayoutは、もっとも素直なレイアウトで、左上詰めで子要素を配置するレイアウトです。一番多用するレイアウトです。子要素を配置する方向(縦か横か)を決めることができます。
Chapter01の画面は以下のようになっています。
この画面はLinearLayoutというレイアウトとTextViewというウィジェットで構成されています。パッと見では、全部縦方向に配置されているようにみえるかもしれませんので、視覚的に表してみます。青い枠のLinearLayoutの中に、赤い枠のLinearLayoutが入っています。赤い枠のほうは、横方向にレイアウトを配置しています。

コードレビュー

では、レイアウトのソースコードを見てみましょう。
Sample01プロジェクトの、/res/layout/chapter01.xml を開いて下さい。

注目するべきところは、LinearLayoutという要素の、android:orientationという属性です。それ以外は単にテキストを表示しているだけなので、まぁそんなものだと思っておいてください。

ちなみに、layout_widthとlayout_heightは要素の横幅、縦幅を表します。fill_parentだと親要素分全部使います。つまり、width: 100%;です。wrap_contentは、必要な分だけ使うという指定です。数値でも指定可能ですが、ひとまずはこの2つを押さえましょう。また、match_parentというのもあります。2.2以降では、fill_parentではなく、match_parentを使いますが、Xperiaがある限りは、fill_parentを使わざるをえません…。

<?xml version="1.0" encoding="utf-8"?>
<LinearLayout
    xmlns:android="http://schemas.android.com/apk/res/android"
    android:orientation="vertical"
    android:layout_width="fill_parent"
    android:layout_height="fill_parent">
    <!-- ここから垂直方向 -->
    <TextView
        android:layout_width="wrap_content"
        android:layout_height="wrap_content"
        android:text="@string/chapter01_linearlayout_vertical" />
    <TextView
        android:layout_width="wrap_content"
        android:layout_height="wrap_content"
        android:text="@string/chapter01_test_1" />
    <TextView
        android:layout_width="wrap_content"
        android:layout_height="wrap_content"
        android:text="@string/chapter01_test_2" />
    <TextView
        android:layout_width="wrap_content"
        android:layout_height="wrap_content"
        android:text="@string/chapter01_test_3" />
    <TextView
        android:layout_width="wrap_content"
        android:layout_height="wrap_content"
        android:text="@string/chapter01_linearlayout_horizontal" />
    <!-- ここから水平方向 -->
    <LinearLayout
        android:orientation="horizontal"
        android:layout_width="fill_parent"
        android:layout_height="wrap_content">
        <TextView
            android:layout_width="wrap_content"
            android:layout_height="wrap_content"
            android:text="@string/chapter01_test_4" />
        <TextView
            android:layout_width="wrap_content"
            android:layout_height="wrap_content"
            android:text="@string/chapter01_test_5" />
        <TextView
            android:layout_width="wrap_content"
            android:layout_height="wrap_content"
            android:text="@string/chapter01_test_6" />
    </LinearLayout>
    <!-- ここまで水平方向 -->
    <!-- また垂直方向 -->
    <TextView
        android:layout_width="wrap_content"
        android:layout_height="wrap_content"
        android:text="@string/chapter01_test_7" />
    <TextView
        android:layout_width="wrap_content"
        android:layout_height="wrap_content"
        android:text="@string/chapter01_test_8" />
    <TextView
        android:layout_width="wrap_content"
        android:layout_height="wrap_content"
        android:text="@string/chapter01_test_9" />
</LinearLayout>
orientation属性は、子要素の配置方向を決定します。

  • vertical・・・縦方向
  • horizontal・・・横方向

途中に存在するLinearLayoutも、親要素のLinearLayoutの子要素なので、あくまで縦方向に配置される要素として置いてあります。しかし、その中身は横方向に配置されています。

単純な例でLinearLayoutを紹介しましたが、複雑なレイアウトも、ほとんどはLinearLayoutを入れ子にしたレイアウトです。縦方向の途中の要素で横方向のレイアウトが必要になったら、LinearLayoutを追加して、orientationをhorizontalに設定して配置。それを抜けたらまた縦方向。もし横方向内で縦のレイアウトが使いたい場合は、さらにLinearLayoutを入れ子にして…という感じです。

divタグの中にdivタグを入れて、さらにdivタグを入れて…というのに似ています。

LinearLayoutの特徴が分かっていただけましたでしょうか?
次回は、RelativeLayoutの特徴を説明します。

2011年9月28日水曜日

スクリーンショットを撮る方法(DDMS)

ふと記事を書いている途中で思って、これこそが重要じゃないかと気づきました。スクリーンショットですね。せっかくデザインしても、実際に端末見せたり、PCでエミュレータ起動して、「こんな感じで」とかするのはあまりにも無謀です。できるけど面倒臭いし、プレゼンとかに載せられない。

ということで、スクリーンショットを撮る方法を書きます。

スクリーンショットを撮るのは簡単です。DDMSです。
DDMSって何ぞ?という人は、この記事をまず読んでください

では、DDMSのパースペクティブを開きます。
左上のデバイスの部分にカメラみたいなマークがありますね。これを押します。

 押したら、スクリーンショットのウィンドウが出てきます。
上にメニューがあります。
  • リフレッシュ・・・スクリーンショットを現在の画面で撮りなおす
  • Rotate・・・スクリーンショットを回転させる
  • 保管・・・保存する
  • コピー・・・クリップボードにコピーする
  • 終了・・・ウィンドウを閉じる

デザインが終わったら、これでスクリーンショットを撮って、スライドに載せたり、Android Marketにアップしたりしましょう。

サンプルアプリの使い方について

さて、ようやくレイアウトの話になっていきます。まだサンプルプロジェクトをEclipseに用意してない人は、サンプルプロジェクトをElipseにインポートしておいてください。以下のURLで説明しています。

Eclipseでプロジェクトをインポートする(zipのまま)

インポートできているものとして話を進めます。

サンプルアプリは、特に処理の実装はしておらず、あくまでもレイアウトをXMLでやるだけにしています。しかしたくさんのプロジェクトを作って説明するのはインポートする手間も増えて大変なので、ある程度の量を1つのプロジェクトにまとめています(今後はプロジェクト増える予定ですが)。

では起動してみましょう。プロジェクト上で右クリックして、実行 > Androidアプリケーションを選択します。

 今回はエミュレータを起動させました。メニューを押してみましょう。
chapter01~chapter06まで、レイアウトのサンプルが入っているので、このブログでそれぞれ説明していきます。
次回は、chapter01について説明します。